
I have had requests for a tutorial of how I made the birdhouse I posted. So, here it is.
I hope that you enjoy making one of your own! I would love to see photos and I will post them on my blog! You can e-mail me at bdr@chorus.net and send them as an attachment. :<} I hope to hear from you!
The template that I used to make the birdhouse in this tutorial can be found on Nichole Heady's blog, "CAPTURE the moment". Thank You! Nichole for this fun project and for sharing such a great blog! Click on this link to download your own free copy! Download Bird Box Template
Print the birdhouse template directly onto the card stock or trace around it and cut out. The roof of the birdhouse will be cut separately later and the measurements are printed on the template sheet. I printed my template to the backside of this great barn-like red with white stitching paper from the SU Washington Apple DP series.
Don't forget to cut all the tiny lines around the curved sides.

Using a bone folder and a ruler, score all the printed fold lines - starting with the straight lines first - and press them in towards the center.


Carefully score the curved fold line on each side of the front and back walls of the birdhouse with your bone folder. These fold lines must be accurate to insure that the curves of the walls of your birdhouse are smoothly rounded and meet where the roof joins the walls.
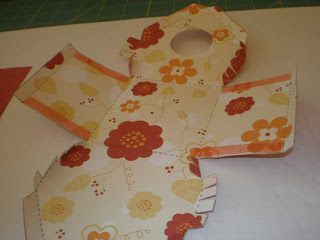
The second photo shows the curved sides of the front of the birdhouse are folded in and ready to glue to the side walls.


When you are finished scoring and folding all the lines, your template will look like this. Here I have put Sticky Strip on the INSIDE of the straight side walls of the birdhouse where they will be attached to the curved front walls. (Do NOT put the adhesive on the curved walls!)
Now put Sticky Strip also on the slanted top edges of the front and back walls where they will be attached to the roof. This goes on the OUTSIDE of the front and back walls.

It's time to attach the straight edge of the side walls to the curved sides of the front and back walls of the birdhouse. Working on ONE SIDE of one wall at a time, remove the Sticky Stip's protective layer and starting at the bottom of the wall, slowly bring the two sides together - the straight cut edge laying on top of the folded curved edge - as you work your way up the wall.
Take your time, as the results of your first few attempts to do this may not be as smooth as you'd like them to be - but each time it gets easier! I would strongly suggest using Snail adhesive until this step becomes familiar to you, as Sticky Strip is NOT forgiving! :<} Especially not on paper! When it's glued, it's glued - which is nice when you don't have to worry about something coming apart - but not when you want to fix an error and start over! :<}


After each of the straight edges has been glued to a curved wall of the birdhouse, use your bone folder to press down on the "seam" on the inside to help to form a smooth curve.

Do all 4 sides and you have the birdhouse together! Now it is time to add a roof.
But first, press the corners of the top of the side walls (where you did not yet add the Sticky Strip) to the front and back walls where you have put the Sticky Strip that will be glued to the roof - after removing the protective layer.


Cut the roof piece according to the measurements in the template pattern and score/fold it in half. I cut the roof for my birdhouse from SU Riding Hood Red CS - as that is the same color as the DP I used - and ran it through my Cuttlebug using their dotted swiss embossing folder to give it a texture.

So at this point, your birdhouse and roof pieces are now ready to assemble.
 A Tip:
This is something I do to make it easier to attach the roof so that the sides remain straight and stable and stay where you want them - as the top edges of both sides of the front and back walls have Sticky Strip on them and you will be attempting to attach the roof to the birdhouse.
First I cut 2 small stips about 1/2 " wide and the width of the side walls.

I then glue one end of the first small strip to the front wall side and the other end of that same stip to the back wall side - and repeat with the second strip - each strip being glued just below the peak.
This will hold the two side walls straight so that one or the other doesn't lean out or cave in as you are trying to make sure that they don't become glued until you have them lined up with an even overhang on each side and the peaks of the front and back walls meeting in the half line fold of the roof. It can be quite the juggling act! :<}

Now with the small strips in place - and the protective layer removed from the Sticky Strips on the front and back wall edges - the roof can be glued to the birdhouse!

A Tip:
When attaching the roof, I do not set the roof down onto the birdhouse from above. Even with the front and back walls straight and secure with the small strips attached, holding the roof in that position did not allow me to see clearly if the overhang was evenly spaced on each side and/or if the front and back wall peaks were meeting at the fold in the roof. Once again, if it gets glued before you have it lined up - it is glued - and you have a crooked roof. Trust me. :<}
What I do is lay the birdhouse down on to the roof.
First, with the protective layers removed from the Sticky Strip on both the peaked front and back wall edges of ONE HALF of the birdhouse, I line up across from peak to peak - so that it is even along side the center fold of the roof - while still holding it ABOVE the roof piece. Then when I can see that the overhang on each side is even and the peaks are at the center fold line of the roof, I set it gently down on the roof, so that it does not move in the process.
This photo is a little blurry - taking photos with one hand while attempting to do what I just wrote with the other - doesn't always work out so well! :<} Hopefully it is clear enough so that you can see what I mean.

Before I attach the other side, I set the birdhouse down on its base - with just the one side glued to the Sticky Strip - so that I can press down the edges that have been glued to make sure that they are secure along the entire ridge on either side of the roof line.

Then I repeat this process by gently and carefully folding down the TOP HALF of the second side of the roof, pressing along the edges to secure.

When it is glued and secure HALF WAY down the second side, I then turn the birdhouse UPSIDE DOWN - so that the roof is now on your work surface once agian - and I sort of "roll" it the rest of the way. I have found this makes the smoothest line where the roof is attached and without bumps or gaps.


As you can see, it creates a nice, even overhang to both sides of the roof - and they look even from both the front and back, because the wall peaks were in the center roof fold and it was easy to see the overhang on the sides as it is was looked at from "under" the roof.

So here is the completed little Red Birdhouse! Tomorrow we decorate it! :<}

Thank you for stopping by today! I hope that you enjoyed my tutorial and that it was easy to follow. Write me if you have any questions. :<}
Take care.
Barbara Diane
3 comments:
Hi Barbara,
The birdhouse is so adorable. I can't wait to make one. Thanks for sharing.
A great tutorial! Love the instructions (and your selection of paper, too). Great job. Thanks for doing!
The birdhouse is very cute. TFS I will be giving this one a try ... maybe today. Have a great weekend.
Post a Comment