My Whimcees

My Whimcees

Wednesday, February 29, 2012

WOYWWednesday & Sassy Cheryl's Show Me #64

Hello!

Just a fun card today! My workdesk is very clean and orderly this morning as I had just finished photgraphing a tour of the storage in my work space before completing this card. To see some workdesks that are much more interesting go to Julia's blog at http://stamping-ground.blogspot.com/

This little guy found an unexpected surprise on his birthday!


The images I used are both Sassy Cheryl's digital images - the mischevious bear with the cake is 'Birthday Cake Desire' and I took the boy from the 'Boy And Pull Toy' image. I have no phrase on the front as there just are no words when this happens! :<) Go to Sassy Cheryl's Blog at http://sassycheryls.blogspot.com/ to see more Show Me sites.

Thank you for stopping by to visit my blog today! Has anyone else noticed that there are 29 days this month!? I sure was a bit slow on that one! Wishing you all good things today on this extra 24 for February! It is 48 degrees already this morning here in this part of WI - so strange!

Barbara Diane

Tuesday, February 28, 2012

My Storage #3 To The Left Of And On My Workdesk

Hello!

On my workdesk I have a center shelf unit and two drawer units - one on each side of the shelves. Because of poor eyesight I have two floor model Ott-Lite lamps that sit behind the workdesk and are centered over the work space.


My glue gun sits on top of the drawer unit on the left of the shelves and in the drawers are all my embossing folders, small dies, shaker frames and pop ups, labels, etc.


On the top shelf in the center unit I keep my large SU ink pads in brown, black, gray and white. Next to them my StazOn black ink pads, Versa Mark plain and sparkle pads, permanent and temporary tape dispensers, glue dots, stamp cleaner, adhesive remover and 6" ruler.

On the bottom shelf in the center units are the 4 color families of SU Classic Stampin' Spots - which I love because they allow me to have all of the colors without the money investment and storage problem in purchasing the large ink pads and they match my SU cardstock. On top of them are the cardstock color samples I made. Next to the ink boxes I keep my Score tapes and a small cutting plate that I use when fussy cutting with a blade those sections that are too small for scissors.
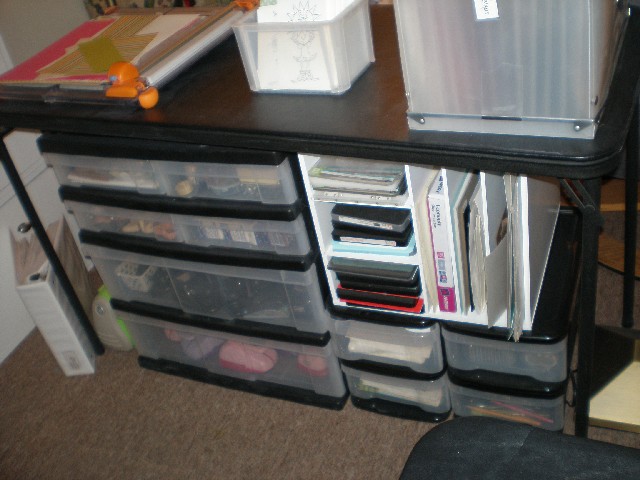
In the drawer unit to the right of the center shelves I keep my Stickles in a turn table on top and my soft cutting pad, another hard cutting pad and all of my clear plastic stamp blocks in the drawers.
To the left of my workdesk I have another drawer system. In the top 6 drawers I keep my clear stamps and those not on wood bases. I have a sheet of white copy paper in the bottom of each drawer so I can see the stamps clearly.


The next 3 drawers hold my wooden stamps - with all of my stamps with phrases together in the middle drawer.In the top drawer of the next 6 drawers I keep all of my clear stamps with phrases - again with a white sheet of copy paper under them. The remaining 5 drawers hold my pearls, rhinestones, tape dispensers, dimensionals, brads, extra blades for my cutting mats, buttons, etc.


In the bottom 3 drawers I keep my sponge pieces, daubers, Honey Pop sheets, tiny stamps, cut outs from dies and many more miscellaneous supplies

Thanks for stopping by to visit my blog today! I hope that you have maybe found an idea for storage - I have had fun sharing how I have mine set up in my workspace. I have lots of supplies but it has taken me years to collect all of this - one item at a time! The table to the left of my workdesk holds my sewing machine and my Big Shot and my Cuttlebug (this table completes the square of my workspace and you can see that on my photos in the first post). I have storage for my sewing and dollmaking which I can share at another time. Wishing you a creative day with your own supplies tomorrow!

Barbara Diane

Monday, February 27, 2012

My Storage #2 To The Right Of My Work Space

Hello!

Today I have more storage photos - this time of the units to the right of my work desk. In the mugs I have my Prismacolor colored pencils (you can see my electric pencil sharpener to the left and behind this mug), the Q-tips and toothpicks in front, tape dispenser, all of my scissors and favorite cutting blade, then the miscellaneous tools and pens I use most often and in the last mug are glues, Crystal Effects and white gel pens.

Behind them in the large white turn table are all of my SU markers with my brushes in the center and in the corner to the left of it are the handy wipes. A number of years ago I was a SU demonstrator and at that time I purchased the entire set of their markers and since then I continue to replace individual markers as needed and add each year's 'In Colors' to my supply. I keep them grouped together in the color families. I keep the SU water color pencils with the markers also.
Next to the turn table are my 8 1/2 x 11 card stock supplies. I most always use SU card stock as I prefer that brand but from time to time I will see some colors that I like when I am in Archiver's and if they have a coupon I will purchse some. I have the current colors labeled as you can see - I cut the symbols out of the SU catalog. On the left are 2 containers that are retired colors and on the right are extra bulk supplies of the current colors and the white, glimmer, shiny, etc. card stock.

Beneath the card stock containers is where I keep my folded 4 x 5 1/2 cards and also any 4 x 5 1/2 cut card stock and under that are the 5 1/2 x 8 1/2 cut card stock - all for easy access when I am creating cards and projects. The solid color scraps of card stock I keep in the container that I posted a photo of last Thursday - that sits on the table behind my chair. At the end are my paper crafts books and also another marker set I use for odd colors.

In the drawers underneath the bookcase I have many more supplies. The set of drawers at the far left hold a lot of miscellaneous things that I don't use everyday. The top one holds my embroidery threads, silk ribbons and cords. The second one has my glitter and embossing powders, embossing pens and Liquid Applique pens. The third drawer holds all of my paper flowers.

The last three drawers hold my quilling supplies and miscellaneous items and kit supplies.

On top of the drawer unit to the right of these I have my small Fiskars cutting board, which I use for scoring, and my Score-Pal. In the four small drawers below I have miscellaneous supplies of different kinds of tape, sponges, Super Glue, bear making supplies, etc. and it is also where I keep my SU chalk set and also my sample CS rings that I made.


In the first large drawer are all of my flower and leaf punches.

In the bottom large drawer are all of my border and corner punches and all miscellaneous (bat, star, fence, etc.) and odd shapes punches like my tag punches.

The bookcase/drawer unit next to these holds all of my three-ring binders that contain hard copies for easy access of classes I have taken, tutorials, templates, techniques, etc. that are also in my computer files.


On the bottom shelf in the left corner is where I keep my 12 x 12 solid cardstock and also where I keep my patterned paper - with the scraps kept in front of the uncut sheets.


Thank you for stopping by today to visit my blog! We still have sunshine here in this part of WI - such a strange winter! Wishing you a happy Monday!

Barbara Diane

Saturday, February 25, 2012

Beautiful Snow Fall

Hello!

We had a heavy, wet snowfall starting Friday night and by yesterday morning it looked like a fairy land outside! It was about 7:00 am when I went out to clean off and move my car. I was amazed at how warm it was and because of that the snow had adhered to every single branch on the trees. It was beautiful. So after I came back inside I got my camera and went back out to take some photographs. You can see that with the warm temperatures the snow was already melting where it had been ploughed but the trees were covered with snow. The sunlight was just coming through the clouds so all the snow was sparkling - I wish I could have captured that also!


And such a nice thing happened to me when I went out to clean off my car! I was the first one out in the parking lot and all of the cars looked like big white lumps as they were so covered in this wet snow. When I started to brush off the car I realized that under the surface snow was a deep layer of ice snow and I had to 'bump' the driver side door with my hip to break the ice so I could open the door and start the car.

All of a sudden I heard a voice from the other side of the car saying "Can I help you?" and when I looked over, there was a young man brushing off the other side of the roof of my car! I said "Thank you, that would be wonderful!" and looked over and saw that he was one of the snow removal team and had just started to plough the lot and when he saw me start to clean off my car he had parked his truck behind my car and got out to come to help me! I had never had that happen before - it was great! Soon my car was cleaned off so I could move it and he went back to ploughing - wasn't that a wonderful way to start the day?!

Thank you for stopping by to visit my blog today! Wishing you a weekend of good things!

Barbara Diane

Friday, February 24, 2012

My Storage - #1 Under The Table

Hello,

After posting photos of my workspace yesterday, I thought I would now share how I organize and store my supplies and all the things I use to create my cards and projects in that workspace.

I will start with the units that are under the table that sits at my back if I am facing my work table and 'separates' my workspace from the living room area. There is a Ott-Lite floor lamp at each end of the table to give me lighting and they can also swivel to be used by someone sitting on the couch or the chair that are on the other side of the table. On the top of the table is my Fiskars paper trimmer, a space I leave for the paper pieces that are left when I am cutting paper for my projects and the container where I keep my solid color CS scraps.

Lined up in the box I have individual sheet protectors - each one has the name written on it of the color of the CS scraps kept inside it and I keep them in order of a color family. White, yellow, orange, red, pink, purple, blue, green, brown, gray and ending with black.

In the unit under the table the top drawers hold my polymer clay supplies, sculpting tools and molds in addition to my teddy bear making tools.

The middle drawer holds all of my oval, circle, square and small slot paper punches


The bottom drawer holds my large purple and pink paper punches.


Next to the drawer unit I have this shelf/slot cube that sits on top of two smaller drawer units, It holds my large dies as well as the plates to my Big Shot and my Cuttlebug.


Under that in the drawers are on the left my different size envelopes and cut white CS for inside cards and miscellaneous paper like addresses, etc. On the right are my plastic bubble containers and under that is my junk drawer that holds extra tools, etc. It is also where I keep my box of sleeve protectors, graph paper, laminating sheets, etc.


This is my container that holds my printed and stamped images that are ready for me to color.


Thank you for stopping by today to visit my blog. More storage units on Monday. Wishing you a great weekend filled with good things!

Barbara Diane

Thursday, February 23, 2012

My Work Space

Hello!

Why the birds? :<) They are my Cordon Bleu finches and they watch me work every day. They love the light from the window and the classical music playing - I also love Adele - and their sweet little noises are an enjoyable background when I am working.

Before I posted I made a quick sketch of my work space - which takes up half of my living room - to give you an idea of the layout. It is sits in the front right corner of the room and is basically a square that I work inside so that I can access everything while sitting in my chair. My apartment is very small so I need to have everything very organized and compact - especially in my work space.


Looking in from the door into the apartment - a small kitchenette is to the right before the living room with a hallway to the left which leads to the bathroom and the bedroom which shares a wall with the living room. Pretty small apartment!


And my 'living room' area of the living room. :<) Not quite half of the room - just space to walk into the area - barely!


Back into the kitchen area on the left (see the little window in the living room wall by the chair - that is between the two rooms) and the door into the apartment. With the doorway on the right into the hall leading to the bathroom which would be on the left of the hall and the bedroom which would be on the right (and it also has a window!) and shares a wall with the living room. Yes, one can get stir crazy in this apartment! :<)


Thank you for stopping by today to visit my blog! I hope that you enjoyed the tour of my workspace. Tomorrow I will have photos of more detail to show what I have in my storage units and how I organize my supplies. Wishing you a fun day in your workspace!

Barbara Diane